The grippers on the MTM use a Hall Effect sensor to measure the
opening. The analog values are converted to an approximate angle
using a linear equation. The goal of the calibration procedure is to
define the scale and offset used for the conversion. The da Vinci MTM
gripper used two small springs, one weak outer spring to keep the
gripper opened and a stronger inner spring (but shorter one) used to
create some resistance when the gripper is almost closed. From the
user point of view, we have 3 different repeatable positions:
Gripper fully opened, this happens when the gripper is left alone.
The position is defined by the mechanical limit.
Gripper closed but not tight. When the user closes the gripper with
very little force, he or she should feel the moment where the
stronger spring engages.
Gripper closed and tight. This position is defined by the
mechanical limit when maximum force is applied to close the gripper.
Ideally, the PSM tool should close when the master gripper is closed
but not tight. Closing the master gripper more should:
Apply more force on the PSM side to reduce the risk of slippage
Give a feeling of force feedback on the master side using the strong
inner spring
For the calibration procedure, we use the fully opened position and
the closed-but-not-tight position. The user should practice with the
gripper (the robot doesn’t have to be turned on) before starting the
calibration to learn how strong the two springs are and repeatedly
find the closed-but-not-tight position.
The gripper calibration program uses the same parameters
as the current calibration program. You will need to specify the port
if you’re not using the default (i.e. fw). To specify another
port, use -p (e.g. -pudpfw). A typical run looks like:
adeguet1@lcsr-dvrk-09:~/ros2_ws/src/dvrk/dvrk_config_jhu/jhu-daVinci$
  sawIntuitiveResearchKitGripperCalibration -c sawRobotIO1394-MTML-gripper-34863.json

Configuration file: sawRobotIO1394-MTML-gripper-34863.json
Port: fw:0
Make sure:
- your computer is connected to the firewire controller.
- the MTM arm corresponding to the configuration file "sawRobotIO1394-MTML-gripper-34863.json" is connected to the controller.
- the E-Stop is opened, this program doesn't require powered actuators.
- you have no other device connected to the firewire chain.
- you have no other program trying to communicate with the controller.

Press any key to start.
Loading config file ...
Creating robot ...

Press any key to start collecting data.
Fully open and close the gripper up to the second spring on the MTM multiple times.
NOTE: It is very important to not close the gripper all the way; stop when you feel some resistance from the second spring.
Keep closing and opening until the counter and range stop increasing.
Press any key to stop collecting data.

  Counter:   533, range: [   16.313 -   60.370 ]

Status: found range [16.313, 60.370] degrees using 533 samples.

Do you want to update the config file with these values? [Y/y]
Enter the new desired max for the gripper, 60 (degrees) is recommended to match the maximum tool opening.
60
Status: offset and scale in JSON configuration file: 261.267 -74.922
Status: new offset and scale:                        333.594 -102.033

Do you want to save these values? [S/s]
Existing IO config file has been renamed sawRobotIO1394-MTML-gripper-34863.json-backup-2024-10-01-14-06-26
Results saved in IO config file sawRobotIO1394-MTML-gripper-34863.json
Notes:
Once the data collection is started, you will see some ‘-’ and ‘+’
signs appear. A new ‘+’ sign appears when we find a new upper value
and a ‘-’ appears when a new lower value is found.
Make sure you don’t close the gripper past the closed-but-not-tight
position. If you do, stop the data collection, do not save the
results and restart the program.
To verify your calibration file, re-run the program, and it should
display a found range from 0 to the maximum value you provided
(suggested is 60).
Since the closed-but-not-tight position depends on the user, it is
not perfectly repeatable. You will need some trials and errors to
fine tune the calibration.
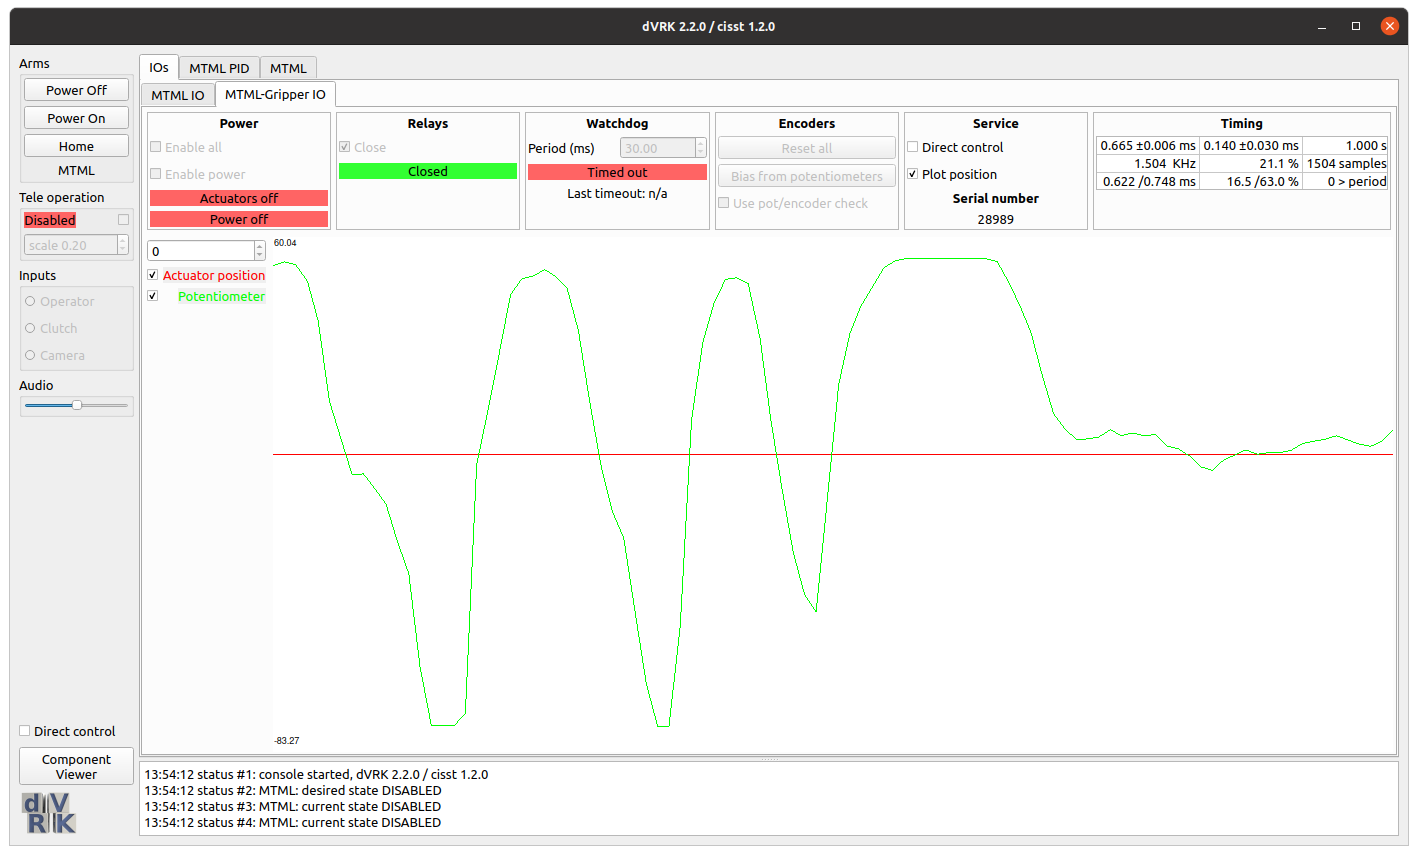
Once you calibrated your MTM gripper, you can visually check the
results using the dVRK system application (either
sawIntuitiveResearchKitSystem or ROS dvrk_robotdvrk_system). Open the GUI tab for your MTM gripper and in
the Service section, select Plot position. You don’t need to
power or home the arm for this step.
At that point, the graph should show the current gripper angle. Open
and close the gripper while observing the graph. When fully open, the
value should be close to 60. When you’re hitting the second spring,
the values should be close to zero and finally, when the gripper is
fully closed, you should reach low negative values (-40 degrees or
less).