11.3.4. Goovis HMD
11.3.4.1. Introduction
The following describes an alternative to the original HRSV unit from ISI. The original units use CRT monitors and the maximum resolution is 720x1280 over VGA. The idea is to replace the display using either a VR headset or HMD. Most VR headset require the use of their SDK and in most cases, transferring the video over Wi-Fi. We looked for a solution that wouldn’t require any SDK and simply show up as an extra monitor under Linux. This way we can just drag and drop the video windows onto the HMD. We tried two different units from Goovis, the FHD one is not great (~$500) but the higher-end one looks like a decent solution (QHD resolution, ~$1200). We don’t know how long these products will be available.
11.3.4.2. Description
Goovis link: https://goovis.net/products/g3max
Amazon link: https://www.amazon.com/GOOVIS-G3-Max-Most-Advanced-OLED-3D-Cinematic-Head-Mounted-Display/dp/B0CGJDQCT2
Head mounted display with dual QHD monitors (2560×1440). The two monitors can slide left/right to adjust to the user’s baseline. There are also focus adjustments, so users can remove their glasses. Other features:
Supports HDMI-3D. We don’t have any code for this (yet).
Supports 3D using a single QHD channel with side-by-side images. The image is split into left and right channels and each use one half of the full image. This means that we loose half the horizontal resolution. The HMD has a button to toggle the 3D. A quick press toggles between 2D and 3D. A long press (3 seconds) swaps the left and right channels.
“Large” field of view (FOV). The internal displays are fairly large and cover most of the straight view for the user.
Warning
The lower-end unit has a smaller FOV, and it feels like you’re looking at a screen far away with a fair amount of black surrounding it.
Head sensor. The HMD automatically turns off the internal displays when the user is not present. It turns out this signal is carried over the USB cable used to power the unit. We can use this USB HID interface to emulate the head sensor. This is quite convenient to turn on/off the teleoperation.
Warning
The lower-end unit (FHD) doesn’t have this feature.
11.3.4.3. Using the internal head sensor
By default, the permissions on Linux are set so only the “root” user
can access the USB HID interface. To grant permissions to all users,
the best approach is to create a udev rule (you can search online
for more information). To identify the device’s vendor ID, product ID
and path, use: lsusb -vvv | less. Search for “GOOVIS”. Once you
found the path (hidraw), vendor Id (880a) and product Id (3501), you
can set your udev rule:
sudo mkdir -p /etc/udev/rules.d # create a directory if needed
cd
echo 'SUBSYSTEM=="hidraw", ATTRS{idVendor}=="880a", ATTRS{idProduct}=="3501", GROUP="users", MODE="0666"' > ~/80-goovis.rules # create the rule
sudo mv ~/80-goovis.rules /etc/udev/rules.d/80-goovis.rules  # move the rule in the proper directory
sudo udevadm control --reload-rules # apply new rules
sudo udevadm trigger # to trigger the rules
To test/debug the udev rules, plug the device and then run udevadm
test $(udevadm info -q path -n /dev/hidraw0).
Then you can test the hid interface using the bus and device Ids
(found using lsusb -vvv). For example, if the bus is 1 and the
device 15:
usbhid-dump -s 1:15 -f -e stream
As you place your head in and out the HMD you should see the values changing in your terminal. The head sensor status is the 17th value.
Once the permissions are set correctly, you can edit your system JSON configuration file to use it.
11.3.4.4. Low-tech solution to stream the endoscope video
The following two solutions create two windows that can be dragged and dropped on the HMD. At that point, the HMD should be in 2D mode (press the 3D button to toggle). The view should be the same in both eyes. After the two windows are created (left and right views), you can drag them to the HMD and place each on one half of the screen (left and right). If you’re using the default window manager for Ubuntu, you can drag the windows to the top corners, and they will automatically resize to use one half of the display. You can also drag the windows and press the “Windows” key + left or right arrow to use the left or right of the display. This works without having to look into the Goovis.
Both solutions are based on gstreamer and rely on the
glimagesink which allows to change the image aspect ratio.
Pure gstreamer
You will need two terminals to start two streams, one for the left
channel and one for the right channel. Assuming your frame grabber is
a DeckLink (Black Magic), the gstreamer pipelines are:
gst-launch-1.0 decklinkvideosrc device-number=0 connection=sdi ! deinterlace ! glimagesink force-aspect-ratio=false
and
gst-launch-1.0 decklinkvideosrc device-number=1 connection=sdi ! deinterlace ! glimagesink force-aspect-ratio=false
ROS gscam
One of the issues with the pure gstreamer approach is that one
can’t use the videos with ROS, whether for data processing or
recording. We added a simple launch file to create two pipelines
(left and right) and for each channel, use a tee (gstreamer
“split”) so gscam can convert the videos to ROS topics. Assuming
your frame grabber is a DeckLink, you can use the launch file
decklink_stereo_goovis.launch included in the dvrk_video
ROS package.
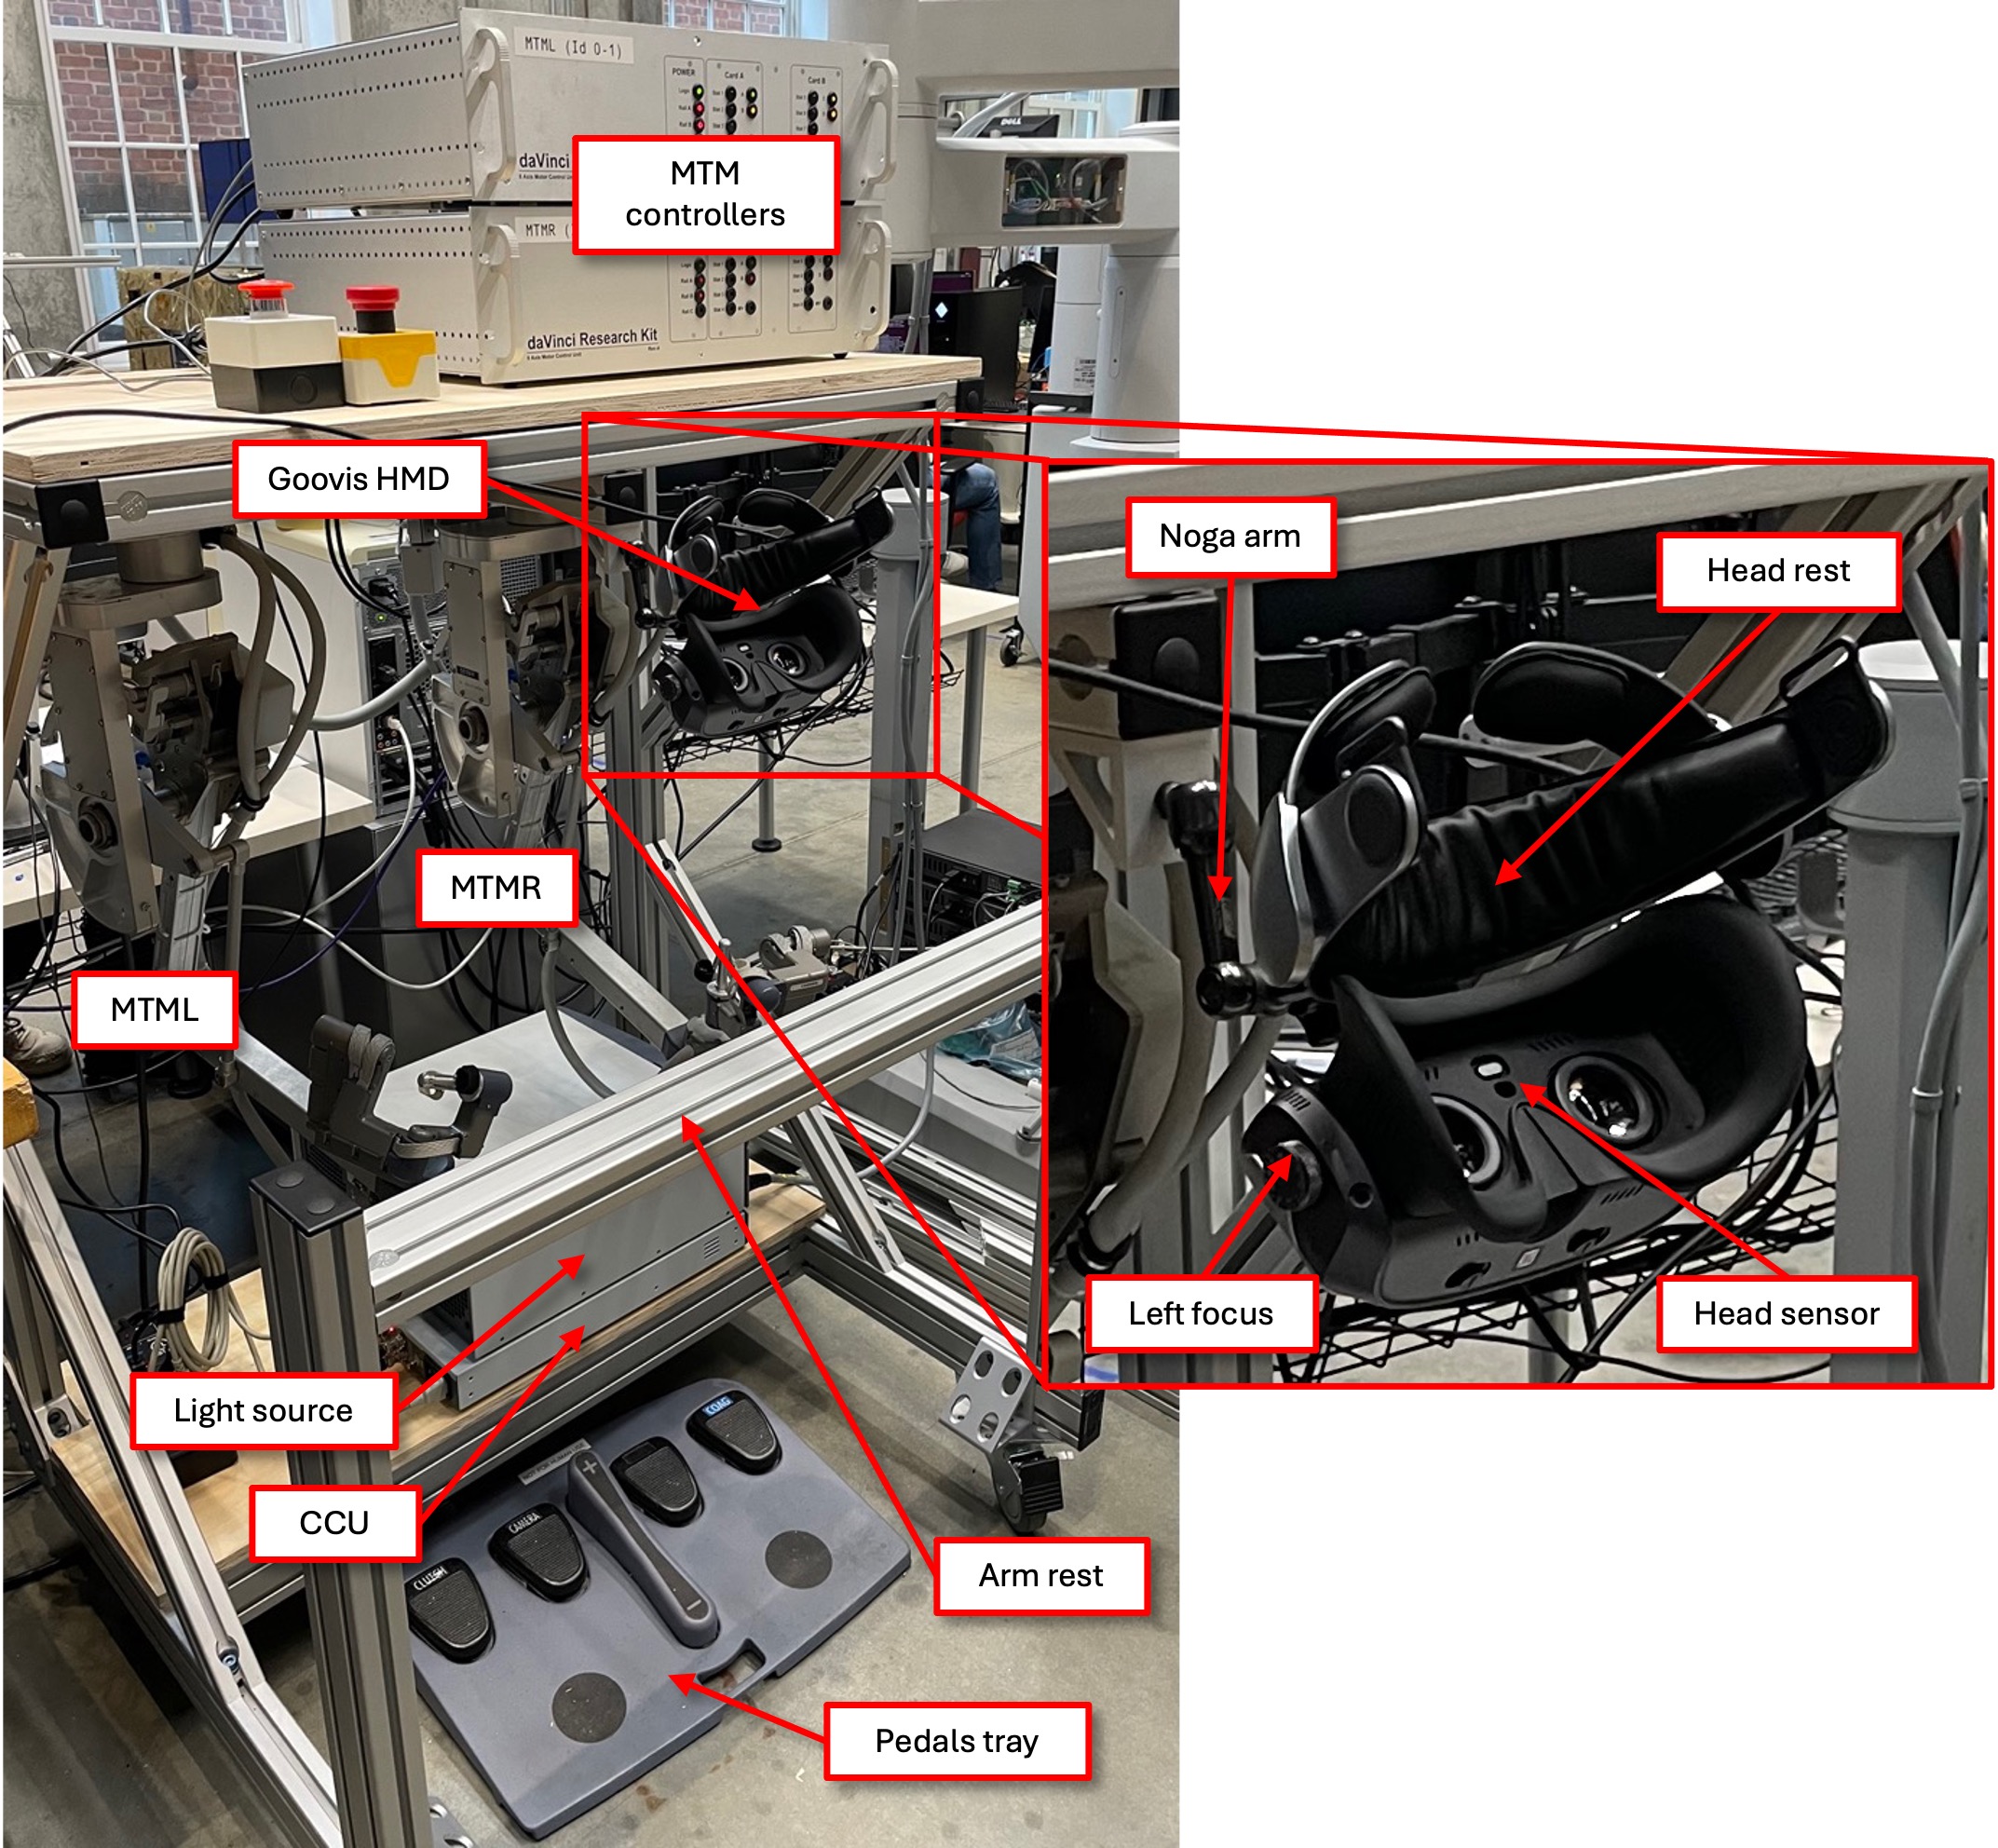
11.3.4.5. Mount
To mount the HMD in a rigid but adjustable way we decided to use a short Noga arm. We then drilled a hole matching the diameter of the screw used at the end of the Noga arm. We removed the head-rest pad and drilled in the middle. This ensured that we drilled through the metal plate used to hold the HMD to the head-rest.
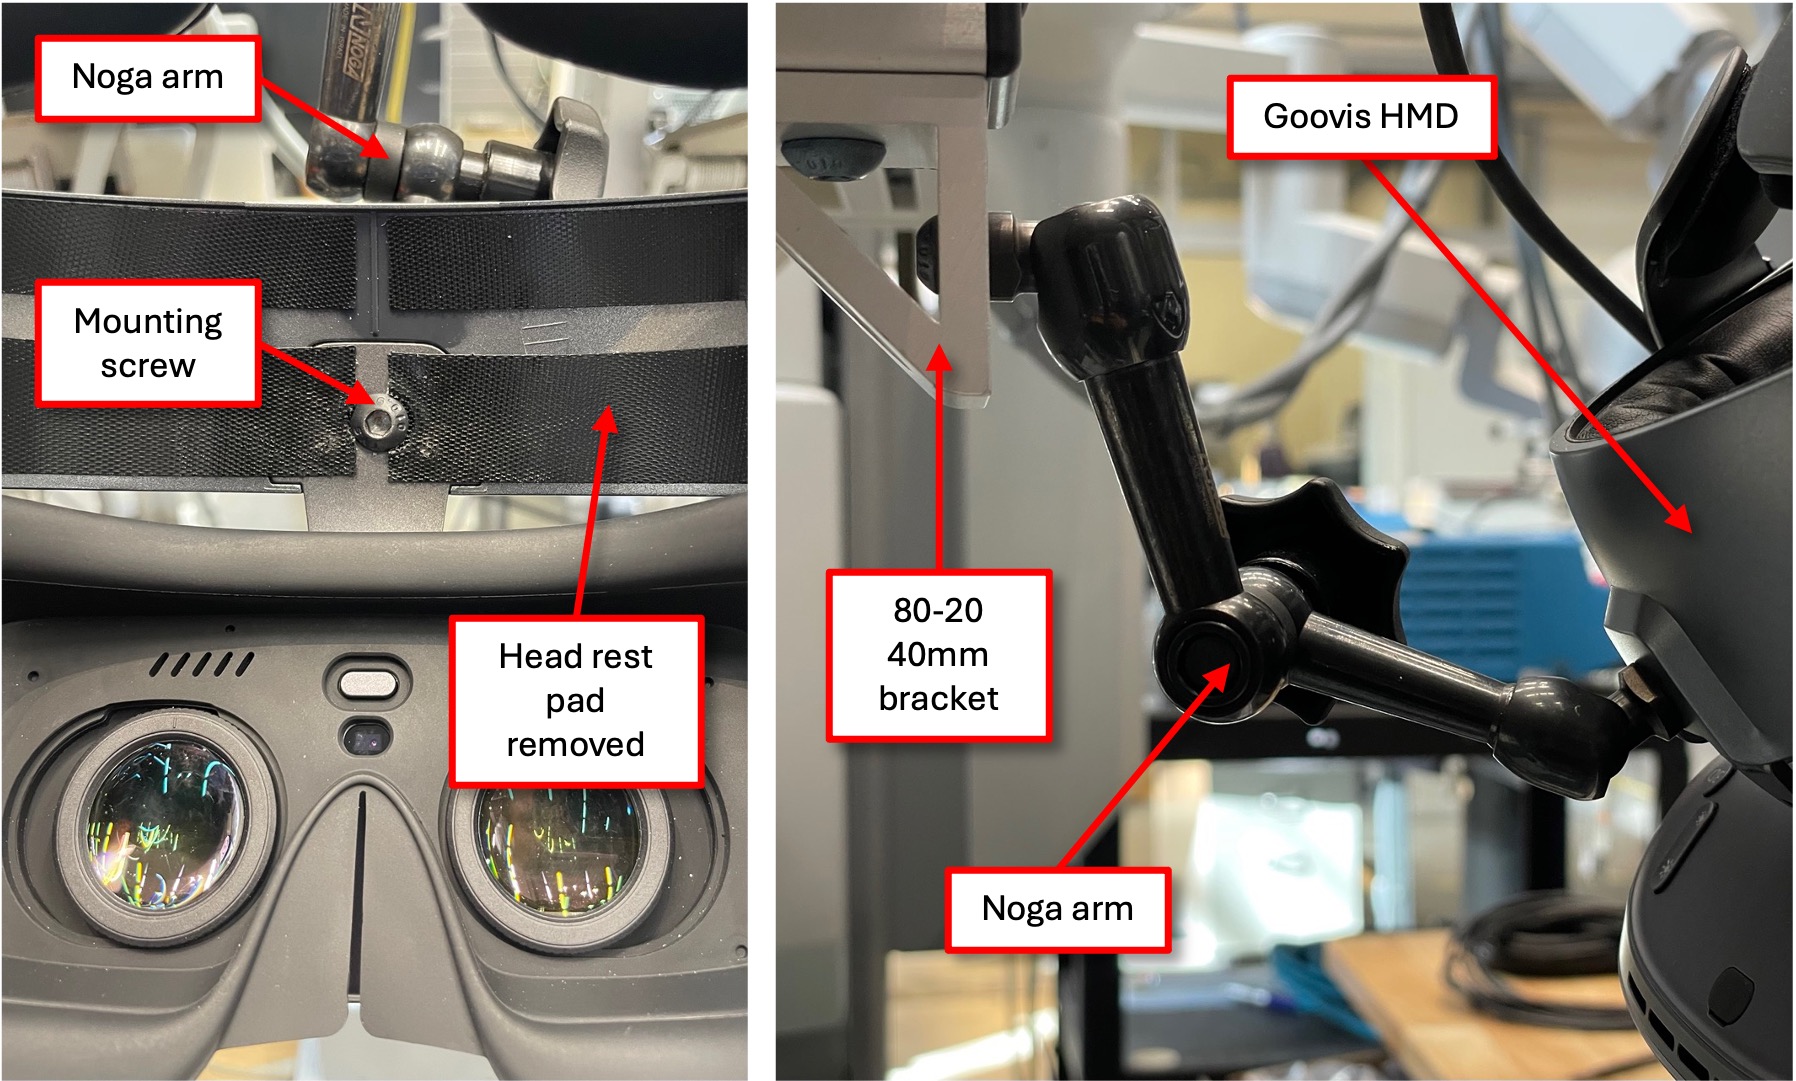
In our case, the surgeon console is built using 80-20 aluminum profiles so it was pretty easy to mount the Noga arm.